- _nosay
Android学习笔记(二)
2017-12-27 13:20:40
AutoCompleteTextView
功能
动态匹配输入的内容,如百度搜索引擎当输入文本时,可以根据内容显示匹配的热门信息独特属性
android: completionThreshold = "2" 设置输入多少字符时自动匹配
下面是布局文件代码
<?xml version="1.0" encoding="utf-8"?>
<LinearLayout xmlns:android="http://schemas.android.com/apk/res/android"
    xmlns:app="http://schemas.android.com/apk/res-auto"
    android:orientation="vertical" android:layout_width="match_parent"
    android:layout_height="match_parent">


    <AutoCompleteTextView
        android:id="@+id/autoCompleteTextView1"
        android:layout_width="match_parent"
        android:layout_height="wrap_content"
        android:completionThreshold="3"
        android:hint="请输入你要搜索的关键词" />
</LinearLayout>
java代码
package com.example.nosay.myapplication;
import android.os.Bundle;
import android.support.annotation.Nullable;
import android.support.v7.app.AppCompatActivity;
import android.widget.ArrayAdapter;
import android.widget.AutoCompleteTextView;
public class MainActivity extends AppCompatActivity{
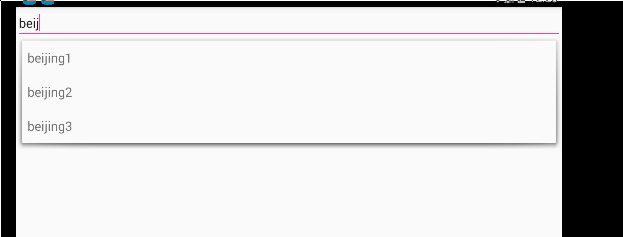
private String[] res = {"beijing1","beijing2","beijing3","shanghai1","shanghai2"};
@Override
protected void onCreate(@Nullable Bundle savedInstanceState) {
super.onCreate(savedInstanceState);
setContentView(R.layout.test1_main);
//第一步 : 初始化控件
AutoCompleteTextView autoCompleteTextView1 = (AutoCompleteTextView) findViewById(R.id.autoCompleteTextView1);
//第二步:需要一个适配器
ArrayAdapter<String> adapter = new ArrayAdapter<String>(this,android.R.layout.simple_list_item_1,res);
//第三步: 初始化数据源,这个数据源去匹配文本框输入的内容,也就是res
//第四步:将adpter与当前AutoCompleteTextView绑定
autoCompleteTextView1.setAdapter(adapter);
}
}
执行结果如图所示
MultiAutoCompleteTextView
功能
可支持选择多个值(在多次输入的情况下),分别用分隔符分开,并且在每个值选中的时候再次输入值时会自动去匹配,可用在发短信,发邮件时选择联系人这种类型中,如图所示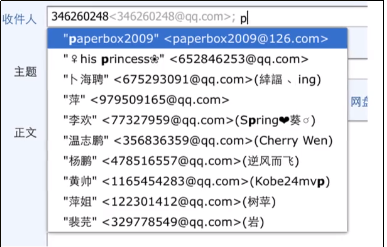
独特属性
android: completionThreshold="2" 设置输入多少字符时自动匹配设置分隔符
mtxt.setTokenizer(new MultiAutoCompleteTextView.CommaTokenizer());
布局文件代码如下所示
<?xml version="1.0" encoding="utf-8"?>
<LinearLayout xmlns:android="http://schemas.android.com/apk/res/android"
    xmlns:app="http://schemas.android.com/apk/res-auto"
    android:orientation="vertical" android:layout_width="match_parent"
    android:layout_height="match_parent">


    <MultiAutoCompleteTextView
        android:id="@+id/multiAutoCompleteTextView"
        android:layout_width="match_parent"
        android:layout_height="wrap_content"
        android:hint="请输入您的收件人" />
</LinearLayout>
java代码
package com.example.nosay.myapplication;

import android.os.Bundle;
import android.support.annotation.Nullable;
import android.support.v7.app.AppCompatActivity;
import android.widget.ArrayAdapter;
import android.widget.MultiAutoCompleteTextView;


public class MainActivity extends AppCompatActivity{

    private String[] res = {"beijing1","beijing2","beijing3","shanghai1","shanghai2"};

    @Override
    protected void onCreate(@Nullable Bundle savedInstanceState) {
        super.onCreate(savedInstanceState);
        setContentView(R.layout.test1_main);

        //第一步,初始化控件
        MultiAutoCompleteTextView multiAutoCompleteTextView1 = (MultiAutoCompleteTextView) findViewById(R.id.multiAutoCompleteTextView);

        //第二步,设置适配器
        ArrayAdapter<String> adapter = new ArrayAdapter<String>(this,android.R.layout.simple_list_item_1,res);

        //第三步,将adpter与当前的multiAutoCompleteTextView1绑定
        multiAutoCompleteTextView1.setAdapter(adapter);

        //第四步,设置分隔符

        multiAutoCompleteTextView1.setTokenizer(new MultiAutoCompleteTextView.CommaTokenizer());


    }

}
运行结果如图所示

ToggleButton
什么是ToggleButton:
ToggleButton有两种状态:选中和未选中状态,并且需要为不同的状态设置不同的显示广西ToggleButton属性:
android: checked = "true"
android: textOff ="关"
android: textOn = "开"
布局文件代码为
<?xml version="1.0" encoding="utf-8"?>
<LinearLayout xmlns:android="http://schemas.android.com/apk/res/android"
    xmlns:app="http://schemas.android.com/apk/res-auto"
    android:orientation="vertical" android:layout_width="match_parent"
    android:layout_height="match_parent">


    <ToggleButton
        android:id="@+id/toggleButton"
        android:layout_width="match_parent"
        android:layout_height="wrap_content"
        android:textOn="开灯"
        android:textOff="关灯"
        android:checked="false"
        />

    <ImageView
        android:id="@+id/imageView"
        android:layout_width="match_parent"
        android:layout_height="match_parent"
        app:srcCompat="@mipmap/on" />
</LinearLayout>
java文件代码为
package com.example.nosay.myapplication;

import android.os.Bundle;
import android.support.annotation.Nullable;
import android.support.v7.app.AppCompatActivity;
import android.widget.CompoundButton;
import android.widget.ImageView;
import android.widget.ToggleButton;


public class MainActivity extends AppCompatActivity implements CompoundButton.OnCheckedChangeListener{

    private ImageView img1;
    private ToggleButton bt1;

    @Override
    protected void onCreate(@Nullable Bundle savedInstanceState) {
        super.onCreate(savedInstanceState);
        setContentView(R.layout.test1_main);

        bt1 = (ToggleButton) findViewById(R.id.toggleButton);
        img1 = (ImageView) findViewById(R.id.imageView);

        //给当前的bt1设置监听器

        bt1.setOnCheckedChangeListener(this);

    }

    @Override
    public void onCheckedChanged(CompoundButton compoundButton, boolean b) {
        //当tb被点击的时候,当前的方法会被执行
        //compoundButton代表被点南控件的本身,b代表被点击控件的状态

        //当点击这个bt的时候,更换img的背景

        img1.setImageResource(b?R.mipmap.off:R.mipmap.on);

    }
}