- _nosay
Android学习笔记(一)
2017-12-27 11:12:00
TextView控件的常用属性
- android:id 控件的id
- android: layout_width 控件的宽度
- android: layout_height 控件的高度
- android: text 文本内容
- android: textSize 文本大小
- android: textColor 文本颜色
- android: background 控件背景
EditText控件的常用属性
- android:id 控件的id
- android: layout_width 控件的宽度
- android: layout_height 控件的高度
- android: text 文本内容
- android: textSize 文本大小
- android: textColor 文本颜色
- android: background 控件背景
- android: hint 输入提示文本
- android: inputType 输入文本类型
使用android studio创建一个新的布局文件,拖拉两个控件,分别为TextView和PlainText,相应的代码如下
<?xml version="1.0" encoding="utf-8"?>
<LinearLayout xmlns:android="http://schemas.android.com/apk/res/android"
    android:orientation="vertical" android:layout_width="match_parent"
    android:layout_height="match_parent">

    <TextView
        android:id="@+id/textView2"
        android:layout_width="match_parent"
        android:layout_height="wrap_content"
        android:text="TextView" />

    <EditText
        android:id="@+id/editText"
        android:layout_width="match_parent"
        android:layout_height="wrap_content"
        android:ems="10"
        android:inputType="textPersonName"
        android:text="Name" />
</LinearLayout>
我们可以看到,它默认的layout_width,和layout_height分别给了match_parent,和wrap_content。并不是用一个固定的大小来表示的,这些match_parent,t wrap_content等是什么意思呢?
- wrap_content 包裹实际文本的内容,也就是说你文本有多宽,实际控件就有多宽
- match_parent 当前控件铺满父类容器。这里就多了一个名词,父类容器。谁是父类容器呢?也就是说谁包裹它,谁就是它的父类容器。很明显LinearLayout就是它的父类容器。
- file_parent 当前控件铺满父类容器。那么问题来了,这个功能和match_parent功能几乎是一样的,那么它们有什么区别。答案是,并没有任何区别,match_parent是在2.3api之后添加的一个属性值。而file_parent是之前的一个属性值。可能是单词看起来不够直观吧。所以只需要记住match_parent就好。
ImageView
- 什么是ImageView
是显示图片的一个控件 - ImageView属性
android: src = "@drawable/ic_launcher" ImageView的内容图像
android: background = "@drawable/ic_launcher" ImageView背景图片
android: background = "#00ff00" ImageView的RGB颜色
下面是一个简单的使用demo
<?xml version="1.0" encoding="utf-8"?>
<LinearLayout xmlns:android="http://schemas.android.com/apk/res/android"
    xmlns:app="http://schemas.android.com/apk/res-auto"
    android:orientation="vertical" android:layout_width="match_parent"
    android:layout_height="match_parent">


    <ImageView
        android:id="@+id/imageView"
        android:layout_width="match_parent"
        android:layout_height="wrap_content"
        android:background="#000000"
        app:srcCompat="@mipmap/ic_launcher" />

    <ImageView
        android:id="@+id/imageView1"
        android:layout_width="match_parent"
        android:layout_height="wrap_content"
        android:background="@mipmap/ic_launcher" />

    <ImageView
        android:id="@+id/imageView2"
        android:layout_width="match_parent"
        android:layout_height="20dp"
        android:background="#000000" />
</LinearLayout>
运行结果如图所示
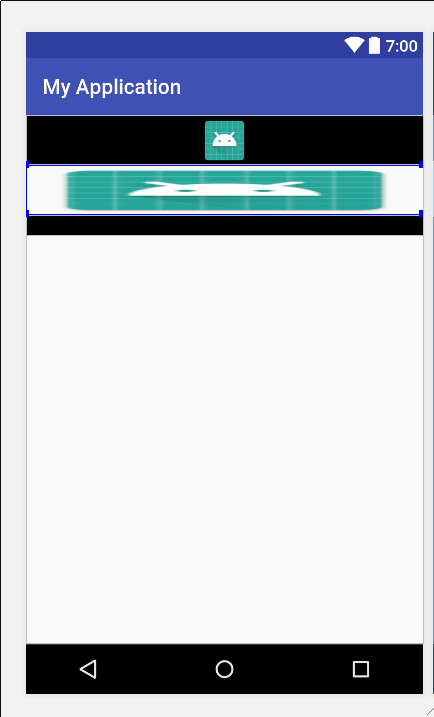
我们发现,在使用图片资源文件的时候,图片分布情况如下
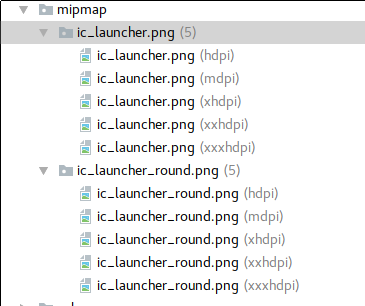
而我们引入图片的时候,只需要导入此路径,就可以正确的引入图片 @mipmap/ic_launcher,其实它在文件管理器中的显示是这样的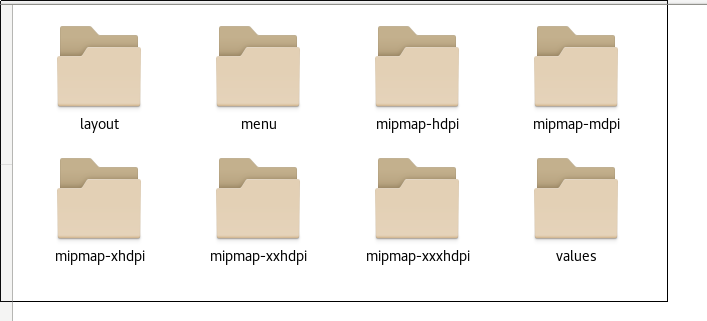
这是因为不同的机型分辨率是不一样的,所以android比较聪明的通过当前的机型来引入正确的图片了。于是我们需要在相应的文件夹中,放入合适的分辨率,这样能使我们的app程序在不同的机器上,引入适配的图片,从而更美观。
Button 按钮
在布局文件中,按钮是由以下代码展现出来的
<Button
        android:id="@+id/button1"
        android:layout_width="match_parent"
        android:layout_height="wrap_content"
        android:text="Button"
        />
ImageButton 图片按钮
在布局文件中,图片按钮是由以下代码展现出来的
<ImageButton
        android:id="@+id/imageButton1"
        android:layout_width="match_parent"
        android:layout_height="wrap_content"
        android:src="@mipmap/ic_launcher"
        />
Button和ImageButton特征
共有的特征
都可以作为一个按钮产生点击事件不同点
Button有text的属性,ImageButton没有 ImageButton有src的属性,Buttoni没有- 产生明显的点击效果
Button可以设置文本内容的一个按钮
ImageButton不可以设置文本内容,background以及src添加一个image,当前图片上可以做一个有文本内容的图片
Button和ImageButton的监听事件
Button和ImageButton都拥有一个onclick事件
通过自身的.setOnClickListener(OnClickListener)方法添加点击事件所有的控件都有一个onclick事件
不仅仅Button和ImageButton拥有- 通过点击事件的监听可以实现点击按钮之后要发生什么动作
监听事件实现的几种写法
- 匿名内部类的实现
- 独立类的实现
- 实现接口的方式来实现
匿名内部类Button监听事件的实现
布局代码如下
<?xml version="1.0" encoding="utf-8"?>
<LinearLayout xmlns:android="http://schemas.android.com/apk/res/android"
    xmlns:app="http://schemas.android.com/apk/res-auto"
    android:orientation="vertical" android:layout_width="match_parent"
    android:layout_height="match_parent">

<Button
    android:id="@+id/button1"
    android:layout_width="match_parent"
    android:layout_height="wrap_content"
    android:text="@string/login_name"
    />

    <ImageButton
        android:id="@+id/imageButton1"
        android:layout_width="match_parent"
        android:layout_height="wrap_content"
        app:srcCompat="@mipmap/ic_launcher_round" />


</LinearLayout>- 初始化当前所需要控件。如何初始化一个控件?
private Button loginButton;- 设置Button的监听器,通过监听器实现我们点击Button要操作的事情
完整代码如下
package com.example.nosay.myapplication;

import android.os.Bundle;
import android.support.annotation.Nullable;
import android.support.v7.app.AppCompatActivity;
import android.view.View;
import android.widget.Button;


public class MainActivity extends AppCompatActivity {

    private Button loginButton;
    @Override
    protected void onCreate(@Nullable Bundle savedInstanceState) {
        super.onCreate(savedInstanceState);
        setContentView(R.layout.test1_main);

        loginButton = (Button) findViewById(R.id.button1);

        loginButton.setOnClickListener(new View.OnClickListener() {
            @Override
            public void onClick(View view) {
                System.out.println("my button is click");
            }
        });

    }
}
但点击按钮时,android Studio控制台出现相应的结果,如图

独立类的实现
布局文件代码如下
<?xml version="1.0" encoding="utf-8"?>
<LinearLayout xmlns:android="http://schemas.android.com/apk/res/android"
    xmlns:app="http://schemas.android.com/apk/res-auto"
    android:orientation="vertical" android:layout_width="match_parent"
    android:layout_height="match_parent">


    <Button
        android:id="@+id/button1"
        android:layout_width="match_parent"
        android:layout_height="wrap_content"
        android:text="button1" />

    <Button
        android:id="@+id/button2"
        android:layout_width="match_parent"
        android:layout_height="wrap_content"
        android:text="button2" />


</LinearLayout>
相应的控制代码
package com.example.nosay.myapplication;

import android.os.Bundle;
import android.support.annotation.Nullable;
import android.support.v7.app.AppCompatActivity;
import android.util.Log;
import android.view.View;
import android.widget.Button;
import android.widget.Toast;


public class MainActivity extends AppCompatActivity {

    private Button bt1;
    private Button bt2;
    @Override
    protected void onCreate(@Nullable Bundle savedInstanceState) {
        super.onCreate(savedInstanceState);
        setContentView(R.layout.test1_main);

        bt1 = (Button) findViewById(R.id.button1);
        bt1 = (Button) findViewById(R.id.button1);


        bt1.setOnClickListener(new MyOnClickListener()
        {
            @Override
            public void onClick(View view) {
                super.onClick(view);
                Toast.makeText(MainActivity.this,"click test",Toast.LENGTH_LONG).show();
            }
        });


    }
}


class MyOnClickListener implements View.OnClickListener
{

    @Override
    public void onClick(View view) {
        Log.i("tag","i am your father");
        view.setAlpha(0.5f);
    }
}
我们发现,在点击按钮的过程中,子类的toast方法,和父类的方法都被执行了。这样就会有一个好处,试想如果我们有几十个按钮,每一个按钮要操作自己的事件,还要执行同一个事件,比如说日志记录事件等。这样的话,使用外部类的话,就比较合适了。
通过接口实现按钮的监听事件
相应代码
package com.example.nosay.myapplication;

import android.os.Bundle;
import android.support.annotation.Nullable;
import android.support.v7.app.AppCompatActivity;
import android.util.Log;
import android.view.View;
import android.widget.Button;


public class MainActivity extends AppCompatActivity implements View.OnClickListener {

    @Override
    protected void onCreate(@Nullable Bundle savedInstanceState) {
        super.onCreate(savedInstanceState);
        setContentView(R.layout.test1_main);

        Button bt1 = (Button) findViewById(R.id.button1);

        bt1.setOnClickListener(this);


    }

    @Override
    public void onClick(View view) {
        Log.i("tag","implement");
    }
}